2013 Christmas Decor

Howdy! For any of you stopping by to find out if Bobble Head Baby #3 is a boy or a girl, you’re going to have to wait just one more post. I promise, that’s what’s coming next, but in the mean time, I wanted to post pictures of our 2013 Christmas decorations. I know it’s a bit after the fact, but think of it as the entertaining previews before the gender reveal feature film begins.

Predictably, I went with a blue/white/silver color scheme in the dining room:
DSC_6658DSC_6687The tree featured our collection of family ornaments…DSC_6919
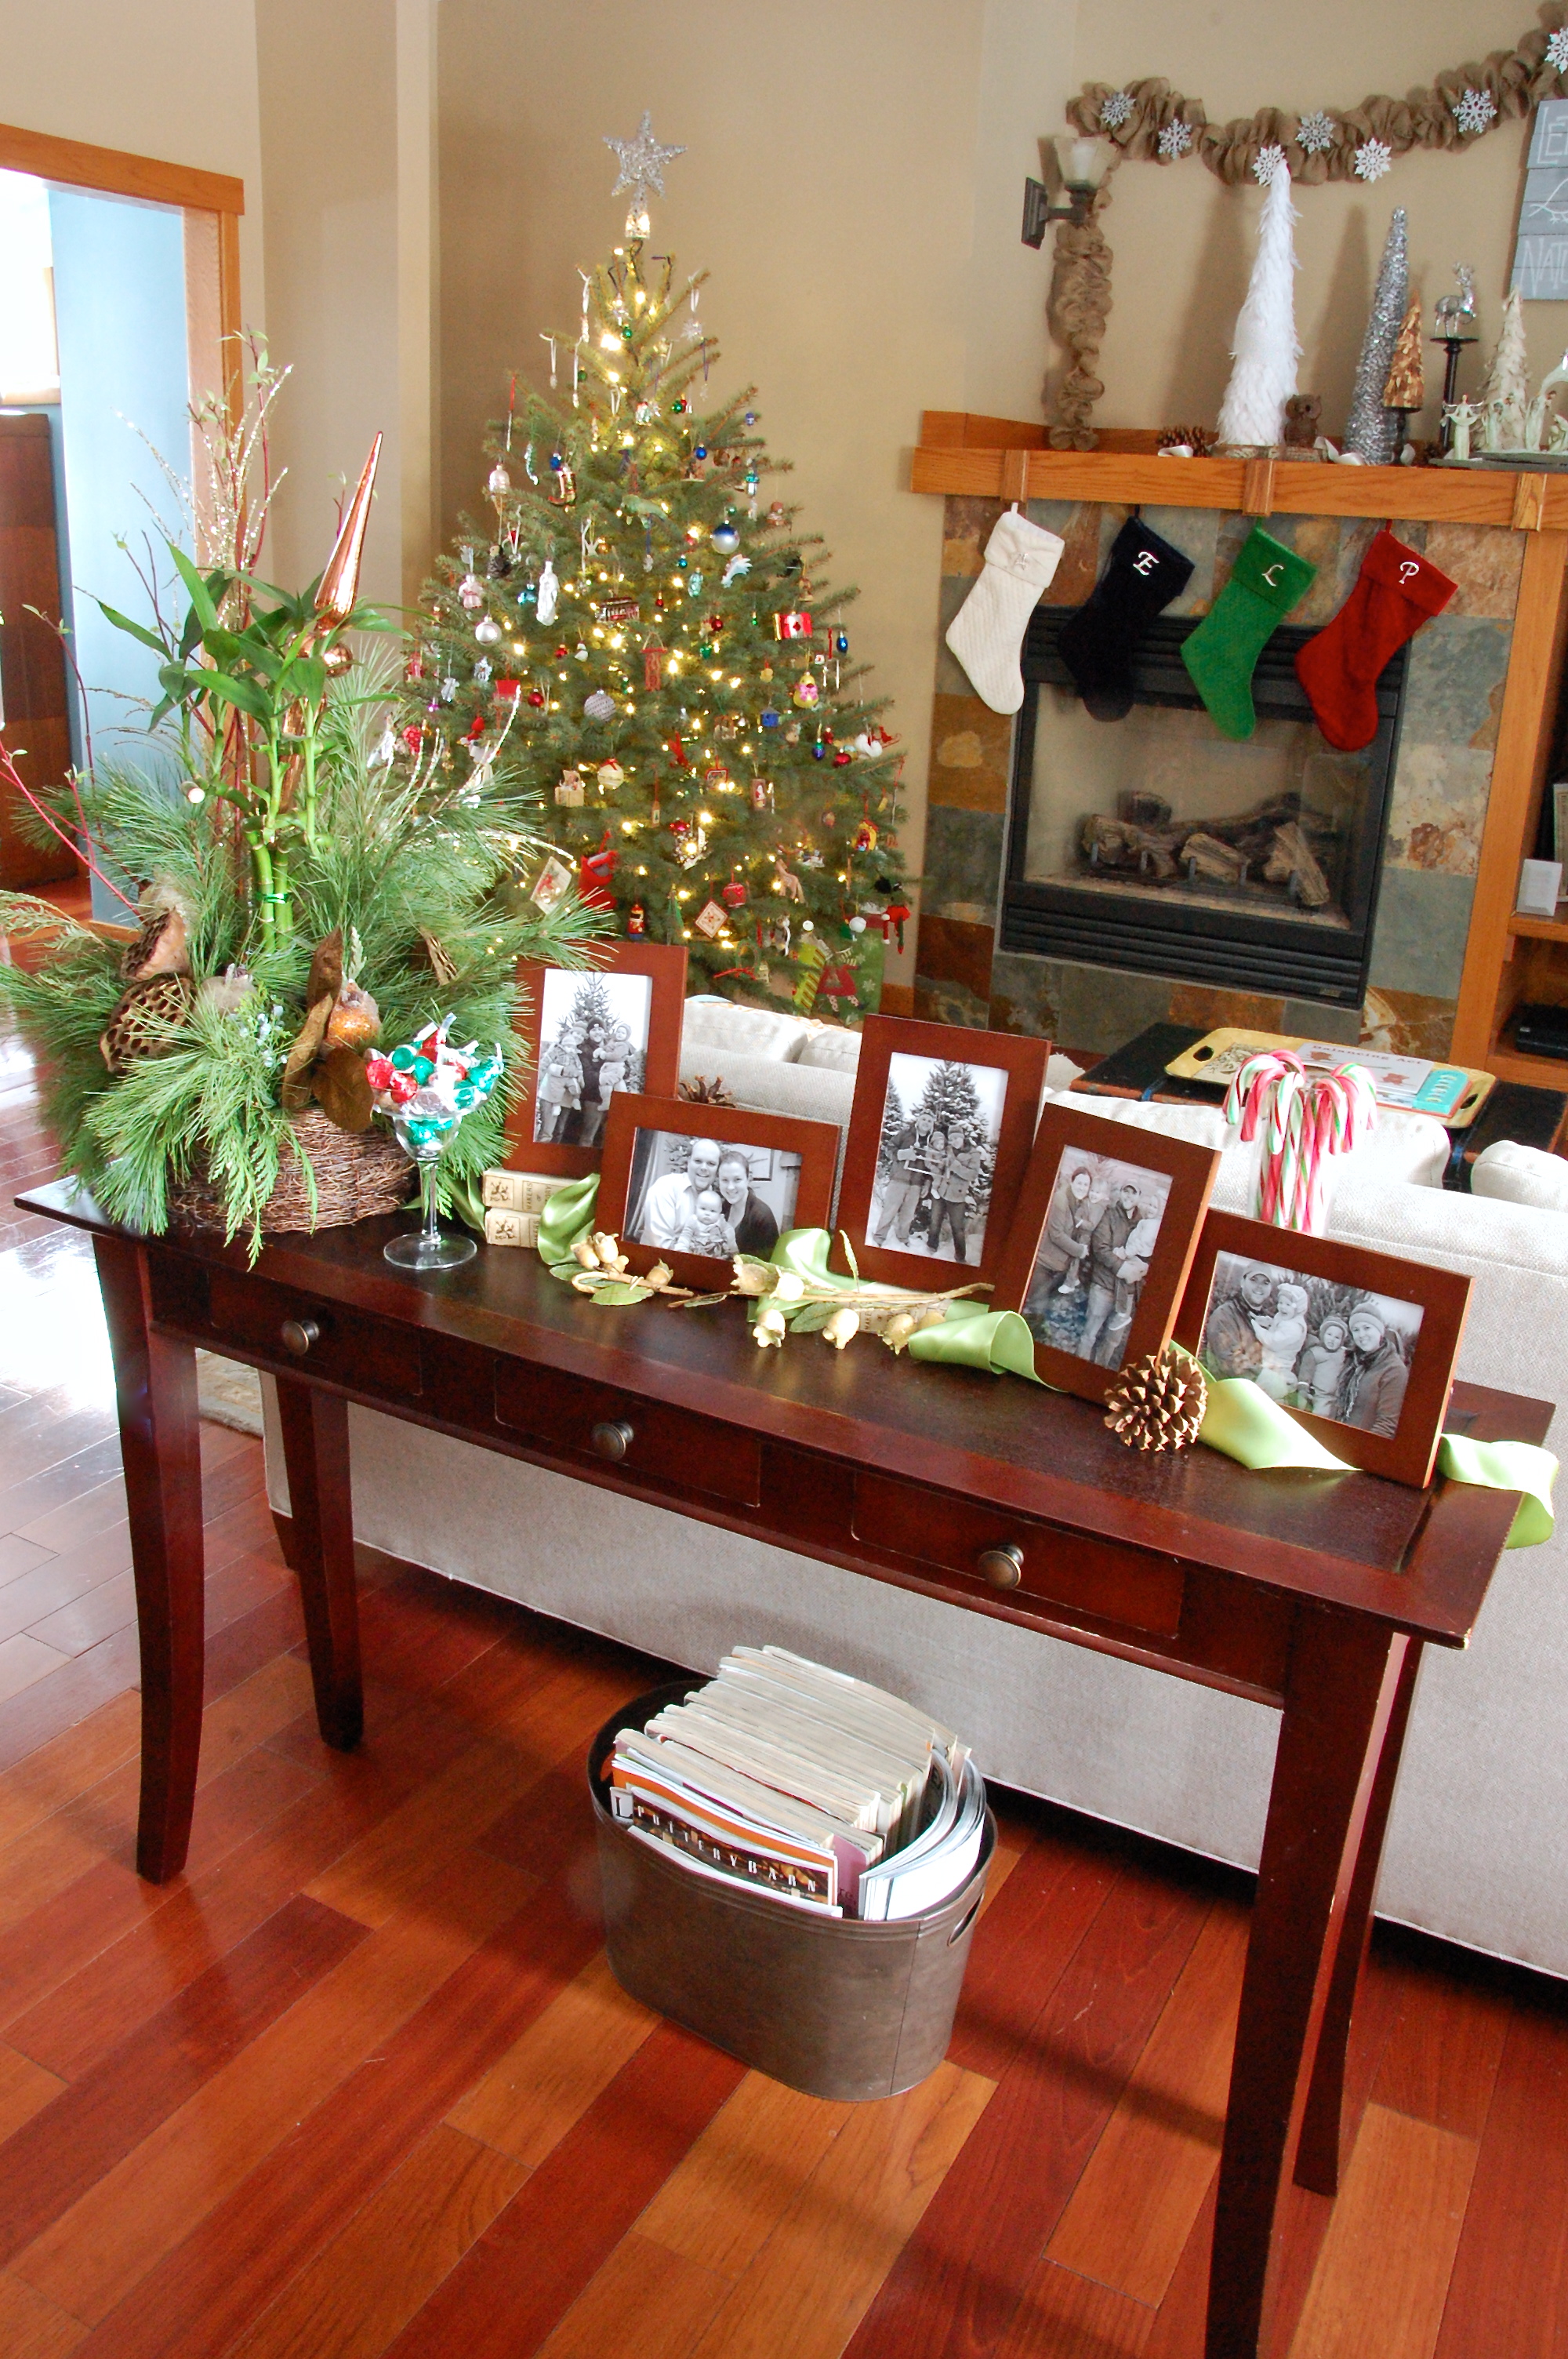
…while the console table was a display of family Christmas tree hunt photos through the years. (Have we been parents long enough that I can use the phrase “through the years”?)
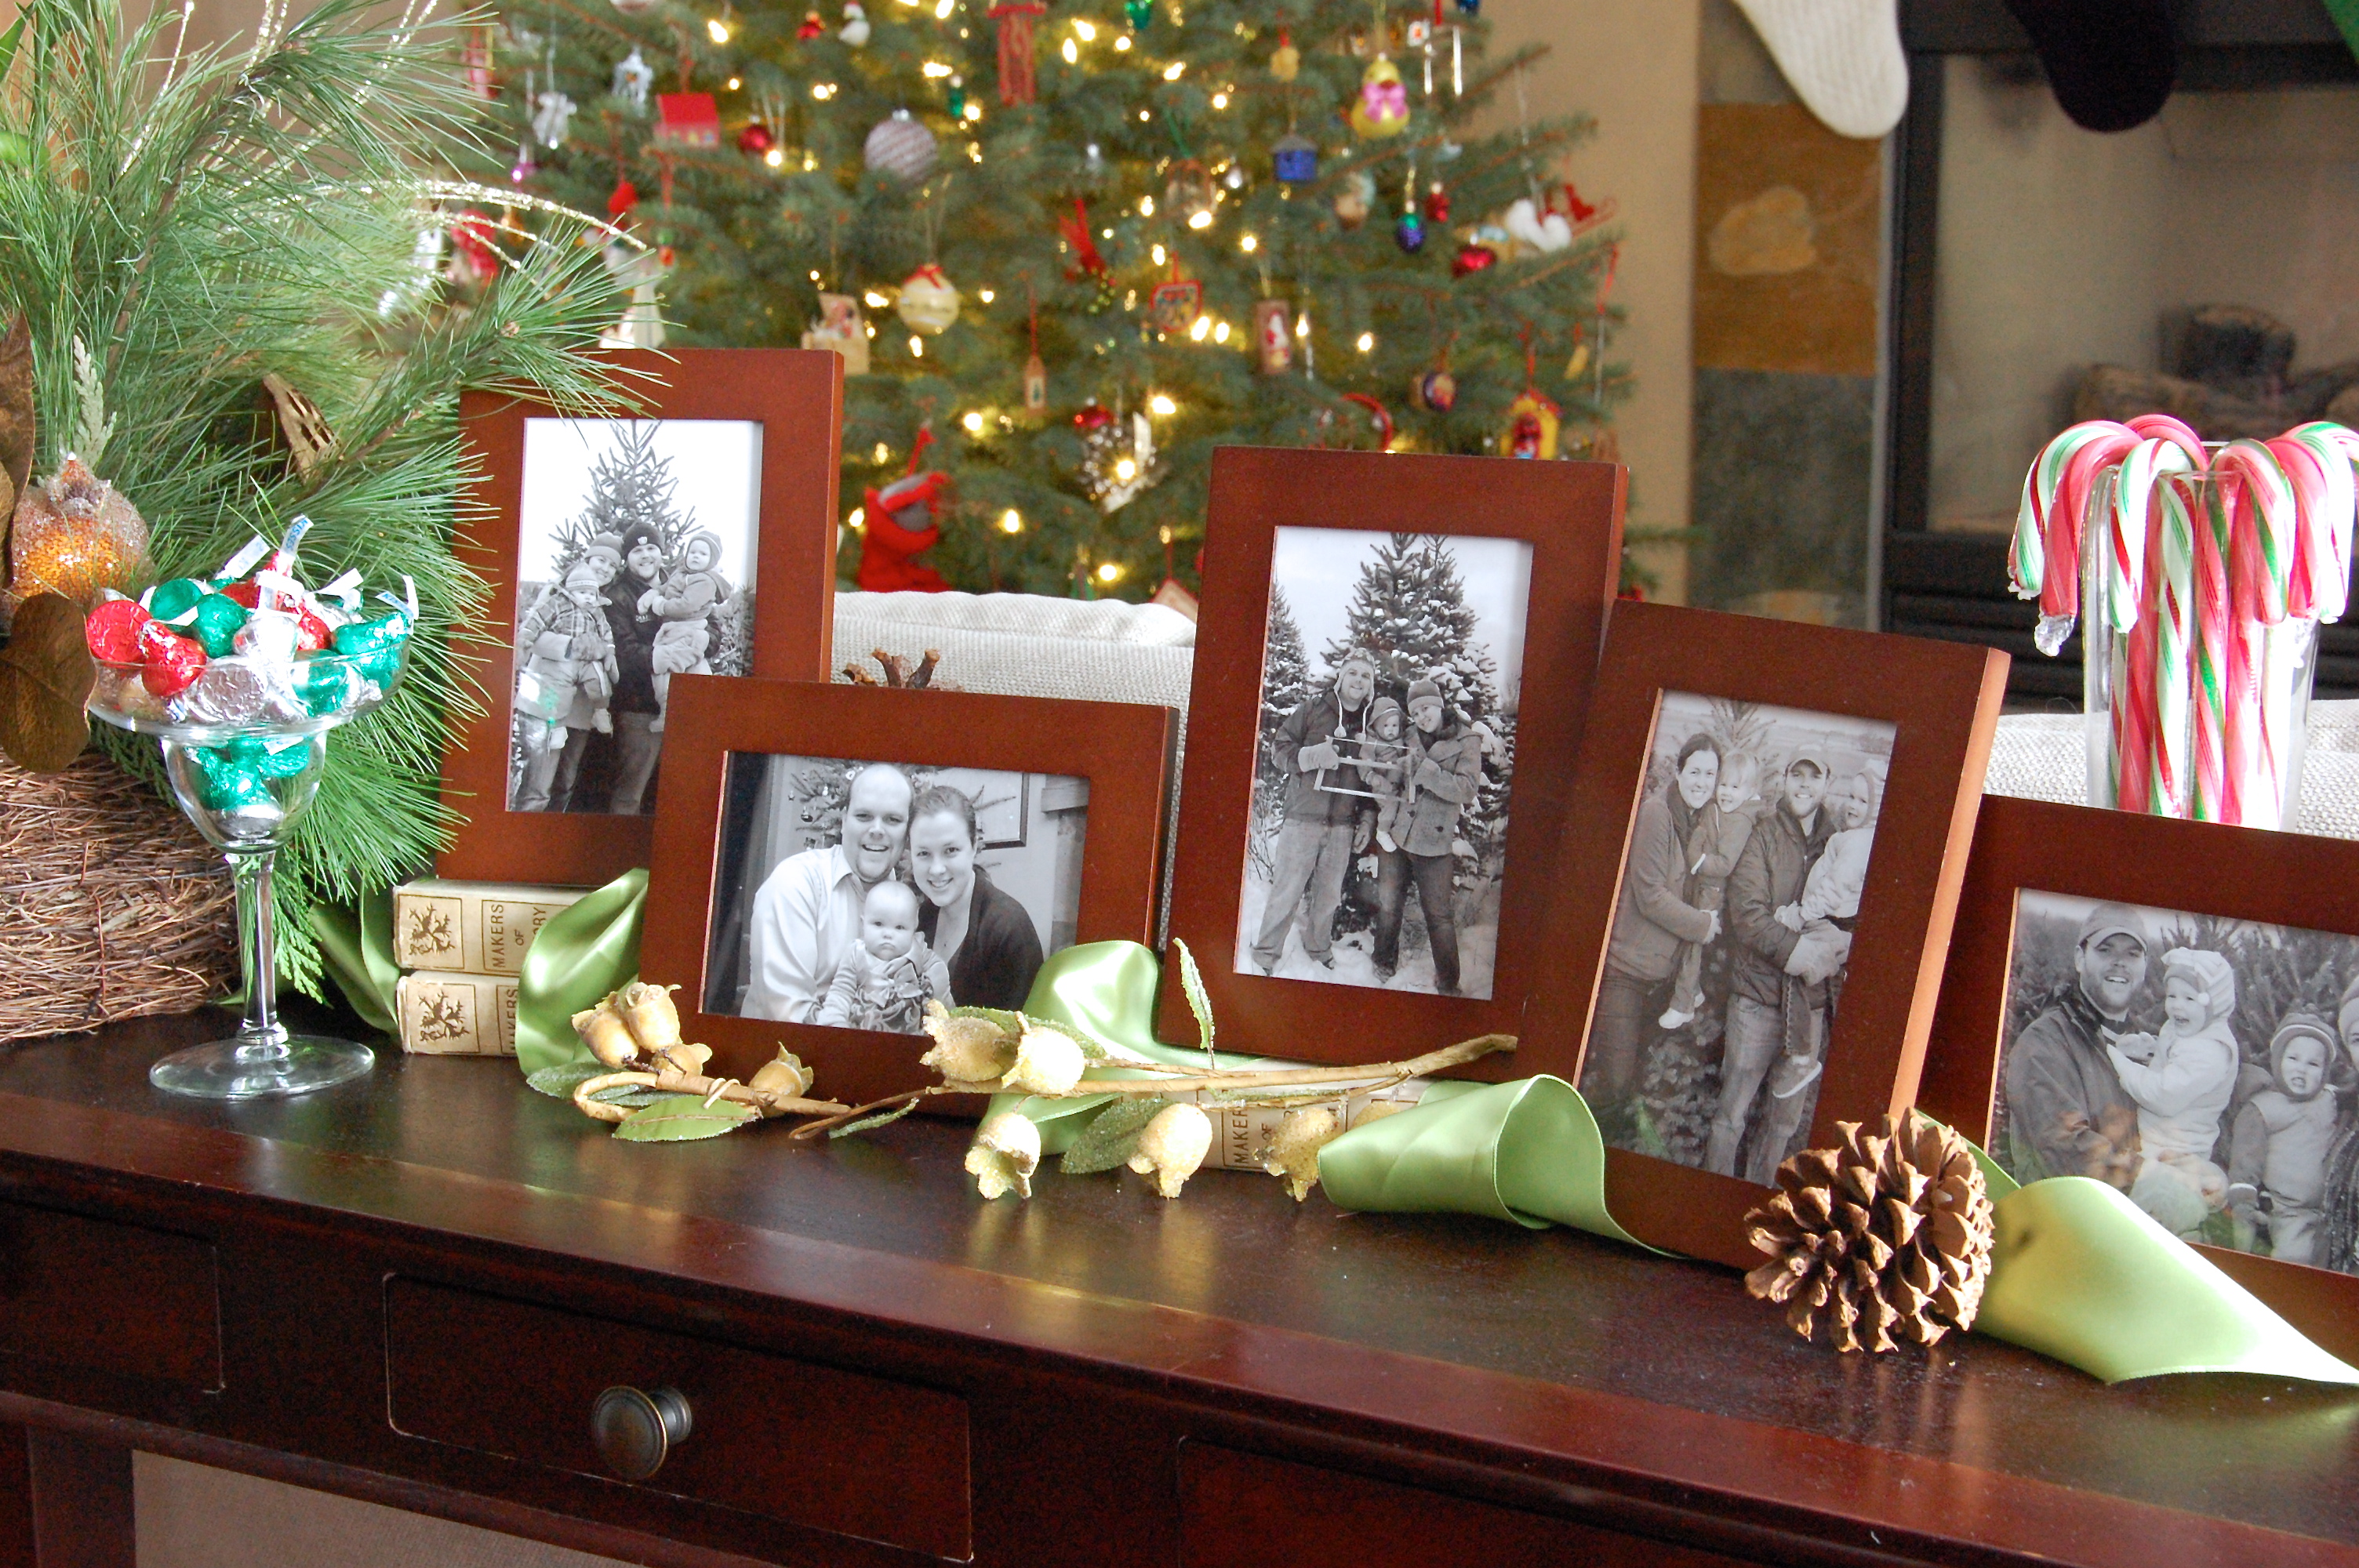
DSC_6928DSC_6924

I was like the decorating Tasmanian Devil this year, so I even did a little vignette on the kitchen table:   DSC_6958

And last, but certainly not least, the mantel, where I reused some of my homemade trees from last year, mixed in a sign made by a good friend of mine, and added a DIY burlap garland festooned with snowflakes:DSC_7158

DSC_7187DSC_7177

So there you go. Christmas 2013 is officially a wrap. And now I’m off to bed, because I have to get up early for my ultrasound appointment!!!!! Oh the suspense!

Now Introducing… The Kitchen Sink

As you may recall, we gave the girls an under-the-basement-stairs playroom for Christmas, and they loved it. And I promised that I would post pictures of it. And I never did.

Sorry about that.

The main reason I never got the photos taken and posted was because the room wasn’t done. My dad was building a toy sink for it and the extreme perfectionist in me hated to take pictures of an incomplete sink-less play kitchen.

But then yesterday at Grandma and Grandpa’s house… what is that hiding beneath a blanket?

It’s the finished sink!

Why, yes, it does have a stainless steel bowl sink (or stainless steel bowl, turned into a sink, if you’d rather) complete with matching stainless drain stopper (it doesn’t actually come out, but it IS water-tight).  I’ll give you all one guess as to which parent I got my perfectionistic tendencies from…

My dad machined out all the pieces for the handles and the faucet. Lydia checked to make sure that Grandpa made it so the knobs actually turn (which naturally, they do…)

Alethea’s first order of business was to have Little Baby Doll wash her hands. Her second order of business was to get out the toy food and a washcloth and start playing kitchen.

And then came my favorite part, which was to take it home, put it in the playroom and take pictures of it. Although I am a little sad that we got four-inch solid oak butcher block counters in our house, and they somehow ended up in the playroom, and not in our real kitchen.

In honor of the momentous occasion, I pulled out two sink related accessories that I’d stashed away: an empty dish-soap bottle and a little yellow dish cloth that Great Grandmother Ruth knitted just for girls.

Alethea came in, saw the new set-up and got right to work scrubbing dishes.

Thanks Dad for making such a special toy for the girls! We all love it!

Now we just have to get the door to the oven reattached (it broke off when it got sat on)  and THEN I’ll (probably) take pictures of the completely finished room. Although I do have a fantastic idea I found on Pinterest for a fabric-covered magnet board that I’m itching to try. So maybe that will have to happen too. But eventually… someday… the room will be done. I think.

But until then, at least we have sparkly clean dishes.

Guest Room Progress Report

Okay, so not gonna lie, I love a good room makeover before and after.  It’s so fun going to other blogs and seeing the amazing room transformations that have been completed.  But to be honest, it’s also a little bit intimidating.  I often think I should post more pictures of whole rooms in my house, but I so seldom feel like rooms have reached their “after” state that I get frozen.  I think, “maybe when I’ve done XYZ, THEN I’ll take ‘after’ pictures.”  But who am I kidding, there are ALWAYS more tweeks and changes and updates waiting to happen.  And I’m okay with that.  I like the fact that my house is evolving with my style and the needs of my family.  That said, I’m about to show you “before” pictures and “where we are now” pictures of my guest bedroom, but I’m not going to call them “after”, they just are a progress report, if you will, because I have no idea when, if ever, the room will be 100% done.

This is what the room looked like in June of 2012 before I got a hold of it…We had a bachelor friend living with us and he was in the process of moving out when I snapped this shot (it wasn’t this messy normally).  Just an FYI in case you wonder where all the stuff went in the rest of the pictures, none of it was ours.

And here is the room as of two weeks ago (from a slightly different angle)…I had originally picked up some fabric from JoAnn’s that I was going to base the room’s style around, but then I remembered this bow tie quilt that my great grandmother had made and I knew it would be the perfect centerpiece for the room.  I’m calling the room’s style “Grandma’s Attic Chic” which is just right since I wanted to work with family hand-me-downs and things I found second hand (or by the side of the road).

The little green end table is my favorite find for the room.  It was $40 at an occasional sale, which is a bit of a splurge for me, but what can I say?  I just fell in love with it and it’s happy green self. (If you have sharp eyes, you may recognize the lamp on the table as this one from the thrift store that Peter hated so much.  I haven’t gotten around to doing anything with it other than switching out the shade, but it already looks better, don’t you think?)

This is an element that isn’t always in the room, but a friend from college was coming to visit, so I put together this welcome basket for her to enjoy during her visit.  It’s something that Peter’s aunt did when we stayed with her last March and I thought it was just so thoughtful that I’ve been doing it for our guests ever since.  I for one think it’s nice when I’m traveling to have easy access to some healthy snacks, a bottle of water, and of course, chocolate!

This is one of the parts of the room that is most certainly still in progress.  Yes, the lamp needs a shade.  And yes, the two drawer chest is much too low to properly function as a bedside table.  The plan is to find an end table or small desk to replace it.  (I may perhaps move in the desk currently in my piano studio if I can ever locate its replacement.)  I am really excited about the coat tree though.  It was a $3 estate sale find that I intend to spray paint a bright happy color just as soon as the weather decides to cooperate.  Is 40 degrees in mid-March really too much to ask?!?!? Seriously, people.

So there you go.  The guest room is making progress.  If the snow ever melts, I’ll try to remember to post another update with the revamped coat rack.  DIE SNOW, DIE!

Piano Studio Makeover

I’ve always said that just about the time I get done decorating my house, I’m going to want to go back and do rooms over again.  However, as it turns out, I couldn’t even make it that long before I made-over a make-over.

Here’s what went down at our house recently…

The last time you saw my office was in 2010, right after we’d finished installing the floating shelves that we made out of a hollow core door.

I was really pleased with how they turned out.  Unfortunately, though, the magazine holders on the right side of the lower shelf were a bit heavy and had to be removed after causing some serious sagging issues.  So the shelves that were supposed to get my office organized ended up having weight restrictions.  No good.  That along with having piano students doing more contests and events meant that my desk area slowly succumbed do some serious paper and music book clutter.

Enter my easy two step organizational plan:
1) Hang wall file holder for organizing frequently accessed teaching materials
2) Use an old picture frame to create a pin board for random papers

So I found an wall file organizer I liked online, ordered it, and the Saturday morning after it arrived at our house, I grabbed a big ol’ frame from my stash in the garage and set them up on my desk to figure out where I was going to hang everything.  A nice little two-step Saturday morning project…

It was at that moment that I realized if I was ever going to add brackets to the shelves to fix the sagging issues, it would be better not to have a whole bunch of stuff hanging in the way that I’d just have to rehang later.  So then I figured that my plan really needed a trip to Home Depot to become a three-step all day Saturday plan:

1) Buy and hang wall file holder for organizing frequently accessed teaching materials
2) Use an old picture frame to create a pin board for random papers
3) Add brackets to shelves to make them useful again

But then it occurred to me that I really have never liked my office paint color.  Oh, I know I said I did.  I defended my color choice up and down.  What else was I supposed to do when Peter said it was “the same color they use in funeral homes”?  But really, it was a horribly bland, slightly peachy, beige color.  It had no interest whatsoever, like the color they use in funeral parlors.

So why install brackets that I’d just have to paint around later?  Why not just have a four-step, takes-all-weekend get the office organized plan?

1) Buy and hang wall file holder for organizing frequently accessed teaching materials
2) Use an old picture frame to create a pin board for random papers
3) Add brackets to shelves to make them useful again
4) PAINT!

What color though, right?  I’ll give you one guess.  What is bright and fresh and clean and would make a dark brown piano stand out like nobody’s business?  White of course!

After running through my Sherwin Williams paint color fandeck, I was down to two choices.  On the left is what I went with, Snowbound, reject color on right is Snowfall.  Alethea was really disappointed when I told her my choice.  She was rooting for another shade of white called Marshmallow.

Anyway, I sensed as I headed out to the paint store Saturday afternoon to get a gallon of the winning color that perhaps Peter was a little apprehensive about me being able to complete a full room painting project before my students began arriving on Monday afternoon.  But, whatever, at this point in my DIY career I can pretty much paint a wall in my sleep right?

The scene in my office Monday afternoon at 1:30pm…

Oi!  So yeah, in the end I did get it picked up enough to teach, but had to pull all the supplies out again and paint some more on Monday night and some more during nap time on Tuesday and literally finished the second coat seven minutes before my first Tuesday student arrived.  So much for my simple four-step one weekend project, huh?

So then, once I blew my timeline, I figured I might as well blow the scope of the project as well, so in addition to painting, adding a wall organizer and adding brackets to the shelves, I also scored a new desk chair thanks to Mr. Craig and his fabulous list:

And got a new lamp with shade for $5.20 at the thrift store today:

So as of this afternoon, my newly appointed office now looks like this:

Clearly the frame to bulletin board transformation hasn’t happened yet.  I’m also thinking that I’d really love a new desk if I could find one for a thrifty price.  Something I can paint to balance out all of the natural wood tones in the space.

That said, I’m really happy with the changes.  It feels so much more ME now.  A little more feminine, a few more vintage touches and a whole lot more white.

Pick A Bed, Any Bed

It’s time.  Time for Lydia to move into a big girl bed.  My baby is growing up… *sniff, sniff*… excuse me while I dry my eyes.

Just a week or two before Christmas she started climbing out of her crib.  We’re taking that as a sign.  However, rather than converting the crib to a toddler bed like we did for Alethea, we are going to move her straight into a big bed.  AND, (drumroll please) her new big bed will be in Alethea’s room.

Now, I am aware that in making this move, we are likely to start rumors, so let me just say for the record: I am NOT pregnant!  We felt that having the girls together in one room at night was better for a number or reasons:

1) The furniture in Alethea’s room is all anchored to the wall.  None of the furniture in the nursery is anchored.  I don’t want Lydia running around in the room at night and pulling something down on herself, but also don’t fancy making more holes in our walls than necessary.

2) If at some point down the road we decide to have another child, we will have one less transition to make.

3) If we don’t have any more children, it will be pretty simple to move the girls back apart later, or perhaps they could have one room for sleeping and one room for a homework/play space.

4) It will simplify the nighttime routine if we read two books together instead of two books each, sing one round of songs, say one set of prayers, etc.  Of course we could do this all together and then separate, but at the moment, that’s not what we’re doing and I would LOVE to shorten the process.

5) Plain and simple, the girls WANT to be together.  They are both excited to be in the same room at night, and I’m being so bold as to hope that it will cut down on the number of middle of the night interventions I have to make because of a suspicious shadow or other imagined disturbances.  *Crossing my fingers*

So we knew we wanted to put the girls together, but then we had to decide on the exact arrangement.  Alethea’s room is a nice size, but not so roomy that we wanted two twin beds on the floor, so bunkbeds made sense.  However, we didn’t feel that Alethea was ready for a top bunk yet, so it was decided that we would try to find a set of bunk beds with a trundle, so that we could just set up the bottom bunk and trundle until Alethea is old enough to attain top bunk status.

After much internet searching, we were down to these four options:

Option #1 –
This one from Bunk Bed King had by far the best price, was a nice color and is made of solid pine.  However, we thought it was the least ‘finished’ looking of all the beds, so we might need to add a side panel at the bottom to hide the trundle when not in use and we also didn’t like how the ladder and trundle would get in each other’s way.

Option #2:
We really liked the overall look of this bed from Target.  It was similar to the first bed, but with a little more interest in the trundle front and a side panel already in place to disguise the trundle.  Also the ladder was nicely positioned out of the way of the trundle drawer.  However, the regular retail price was twice that of option #1.

Option #3:
It was love at first sight when I saw this bed at TheBeanBagStore.com.  It’s white (my favorite color) and the detail, oh the lovely diamond DETAIL!  I’ve never seen such a stylish bunk bed before!  However, price was the number one objection, because even on sale, it was over budget by a couple hundred dollars.  Also, I was afraid the white of the bed wouldn’t be the same as the white of the bookcase already in Alethea’s room and it would annoy me if the whites didn’t match (and I’m not sure it would be good for my marriage if I asked Peter to help me haul the bookcase out of the room for repainting).

Option #4:
Okay, so at $22,605 this bed from PoshTots.com was light years outside our budget, and I’m not even sure it would fit through our front door, but the six year old in me just had to pretend for a minute.  And, yes, that is a slide you see there on the right hand side…

Anyone care to guess which bed we ordered?

If you said option #2, you’d be correct.  The price of number one was great, but then the Target bed went on sale and we used my RedCard to get another 5% off plus free shipping, so it brought the price down enough that it really just made sense to get something we liked as is, rather than buy bed #1 and have to do work to make it look how we wanted it to look.

So now there are six giant boxes sitting in our entry waiting for Peter to get home and start assembling.  Lucky guy.

Pictures of the bed and also Lydia’s birthday party will be headed your way soon.  Stay tuned!

26 Christmas Trees

When I finally got around to counting yesterday, I realized that 26 is how many trees I made, bought and/or decorated this year for Christmas.  I’ll explain…

For my Christmas decor this year, I was inspired by this blog post to make mini Christmas trees by covering cones made from cereal boxes in various materials.  So back at the beginning of November, I started saving cereal boxes and by the end of the month I had made a little forest of twenty-one trees.  Nine went on the mantle:

The trees on the left include my favorite, aka the large white felt triangle tree, as well as the raffia, silver garland and book page trees.  I thought my thrift store reindeer looked just smashing perched up next to the felt tree.

The pinecones, ribbons and books I already had and I mixed them in on the right side with the feather, stick, BBQ wood chip, saran wrap and silver garland trees.  I tell you, once I got started making trees, I was looking at everything inside and outside my house thinking, “I could totally make a tree out of that!”

My favorite part of the mantle though is the center with my beloved nativity and my first ever attempt at chalkboard art.

The Christmas tree parade continues on the console table behind the sofa.  I give you the: thrift store garland, burlap, blue glass (didn’t make that one), taupe felt and beaded garland trees:

It was Peter’s idea to use pictures of Christmas trees past to decorate the table.  Perfect!

Moving onto the dining room, where seven more trees are located…

I stuck with my usual teal, silver and white color scheme for the centerpiece, so was able to use decorations that I’ve used in years past, but then added in a matching pair of teal ribbon trees.

So the grand total is nine trees on the mantle, one freshly cut balsam in the corner, five trees on the console table, seven in the dining room, and then I put one mini tree on a shelf in Alethea’s room and just for fun the girls and I went to Target and bought plastic pink, purple and teal ornaments and we put up the little artificial tree Peter and I used when we lived in an apartment.  The girls love having their own little tree to decorate (and undecorate… Alethea spent several nights sleeping with all the ornaments in her bed).

So that makes 23.  The other tree trees?  Oh, those are a Christmas surprise, but I’ll give you a hint….

Operation Playroom is still in process and Sharpie markers may or may not be involved.

Autumn All Around

It’s November already y’all!  I can hardly believe it, but it means that my autumn decor post is long overdue.  Here’s how I dressed our place up for the fall season.

Here’s the living room:Someday I’ll get to decorate the coffee table and side tables, but with two under 4 running around, for now I’m sticking to the mantle and the console table behind the couch.

Speaking of mantels, I was pretty proud of myself for actually sewing something this year.  Sewing is not my cup of tea, but I knew I wouldn’t regret pulling out my needle and thread to make some plush pumpkins.  I’ve sort of had a crush on them for a long time.

Things every mantel needs: a bit of ribbon, something natural, and a white ceramic animal, preferably a bird.  Isn’t he cute!

Speaking of birds, I love the touch of orange that my new pillows bring to the room.  (For the record, Peter said he thought we probably didn’t need to buy any more throw pillows for our house, but he never said anything about me asking for them for my birthday.  Sometimes I’m so good at finding loopholes, I think I should have been a lawyer.)

Here’s a shot of the whole couch since I know I was negligent in informing you that it arrived back in July.  The official consensus is that we love it and are very happy with our choice.  Yay!

This is the console table behind the couch.  I’ve been trying to seasonally rotate the pictures every month or two, but obviously had some time off since the pumpkin pictures  replaced pictures of Peter and the girls from my Father’s Day display.  Oops!

Moving on to the dining room…

I kept it simple this year and worked with what I had.

I wish I’d had enough stems to make plush pumpkins for the dining room table too, but I’m saving pumpkin stems again, so maybe next year.

I was pleased with how the branches stuck in the wine corks turned out though.

There wasn’t much left in my decor bin for the buffet, so I grabbed a couple faux pumpkins from the thrift store, covered them with some gold spray paint and called it good.

Happy autumn everyone!

Eleven Dollars and Nineteen Cents

The girls and I hit up our local thrift store’s 50% off everything summer clearance sale today and I’m pretty pumped about our $11.19 in loot.

I picked out a lamp and two candle holders and the girls grabbed eight books and a red plastic bucket (because it was 25c and you really can’t ever have too many buckets).

The lamp is my favorite find, although when Peter came home, he took one look at it and said, “What is that?!

Yes, it is hideous, I must admit, but I’m picturing it with a nice little paint job and a brand new shade.  “Have a little faith,” I told him, “It’s going to look fabulous when I get through with it.”  (And if it doesn’t, I can always redonate it and the thrift store can get another $4 for it from some other DIY sucker.  Win-win.)

So now I just have to decide, do I try a faux mercury glass treatment on the glass like this one from Target?

Or do I leave the glass clear and maybe put something inside it, kind of like this one from Amazon.com? Decisions, decisions.  Any votes?

A DIY Mirror Project (and a Porch Sneak Peek)

No, the front porch isn’t done yet.  We hit it hard this past weekend and I am happy to report that all of the masonry and major construction is done.  We are sensing light at the end of the proverbial tunnel, but still have some painting, staining and other finish work to do.  Soon.  It will be done soon.  But in the mean time…

I am ashamed to say that I have been hoarding an embarrassment of picture frame riches in my garage for the past 12 months.  Can you believe that I have had half-a-dozen large and beautiful empty picture frames for a year now and haven’t managed to do a single project with them yet?  *Hangs head in shame*

But this past weekend that all changed.  I finally got one of them transformed and up on my wall.  Here’s how it went down…

Last year we got a stack of great frames from Peter’s parents who were cleaning out his great-aunt’s house.  I loved this one in particular:

I thought it would make a great frame for a mirror, but I wasn’t sure where one might get a custom sized chunk of mirror.  I thought I might have to call one of those glass specialist trucks, but since that seemed likely to be pricey, I made a quick call to Lowes first.  I found out that yes, Lowes does cut custom sized mirrors (up to a certain size), but the guy on the phone was a little fuzzy on the details.

I had a bunch of other stuff to pick up for the front porch project anyway, so the girls and I made a trip one morning to grab what we needed and check out the mirror cutting situation.  Turns out that you buy a large piece of mirror (I think it was 30″x36″) for $17 and then they cut off the piece that you need.  I wish I had known that ahead of time, because I only wanted a 15″x20″ chunk, but after the guy cut it, he asked me if I wanted the rest of the mirror.  And what was I going to say, “No, I paid for it, and it’s perfectly good mirror, but please throw it in the trash”?  Nope, couldn’t do it, so I ended up with not one, but two 15″x20″ pieces as well as two smaller 15″x16″ sections.  (Anyone else sense more mirror projects in my future?)

Back at home, I headed outside to freshen up the picture frame with several coats of gloss white spray paint.  While the paint was drying, I attempted to photograph my recent Lowes acquisition.

Is it a mirror or a portal to another dimension?

So photographing a mirror ended up being a little tricky, but I tell you, if I had known how simple the actual project was going to be, I would have done it ages ago.  One trip to Lowes, a few coats of spray paint, put in some staples with a staple gun, bend staples away from frame, insert mirror, bend staples back and ‘voila!’ it’s done!  One gorgeous framed mirror for around $20, with paint and extra mirror pieces to spare.  Love it!

Lydia thought it was pretty great too.

We had a good time playing with the mirror together.

So that was my adventure in DIY mirror framing.  Right now the finished product is hanging in my dining room, but I’m not sure if that is its permanent home.  We’ll see where it ends up.  I feel like it could look good in just about any room of our house.

It might even look good outside.  But with our super slick new front porch, the mirror probably wouldn’t get the attention it deserves.  I’d say it takes something pretty adorable to distract from something so fabulous as a nearly finished front porch.

Wouldn’t you agree?

Update: To view the completed front porch project, click here.

Take a Seat

Guess what everyone!  We are getting a new couch!  I am so pumped, and here’s why…

When Peter and I bought our house in November of 2008, it meant we were moving from a little cabin in the woods to a two story suburban home.  In terms of square feet, we tripled our living space.  So when we decided to put our green couch and love seat in the basement family room upon moving in, we were left with zero furniture for our first floor living room.  And I do mean zero furniture.  Not a couch or a chair or a rug or a lamp or an end table was in sight. We just had a TV, which we watched while sitting on kitchen chairs.  Not good for snuggling.  So we went shopping.

I found an old trunk on Craigslist that we turned into a coffee table, we nabbed an area rug at Home Depot and then took a trip to the Slumberland Clearance center where we acquired a couch, chair and end table.  (If Peter were writing this post he would tell you all about how I had the poor sales guy carrying pieces of furniture around the store to see how they looked next to each other, but Peter isn’t writing this post, so we’ll skip it.  But if you ever hear him refer to the “Slumberland Incident” you’ll know what he’s talking about.)  So in a few weeks we went from this much furniture…

To (about) this much…

The picture above is actually about 11 months after we moved in, during which time we added several things (console table, stuff on the mantle, etc.) but all the major pieces were in place after just a couple weeks of living in our house.

Here’s what our couch looked like from the front:

Now we knew when we bought one of the cheapest couch models available that we would want to eventually replace it once we had more time for shopping and money in our budget.  We were crossing our fingers that we’d like the couch for 5-7 years.  Well, it’s only been four and a half, but we’re calling that ‘close enough’.  Peter thinks the couch is terribly uncomfortable.  He’s been talking about replacing it for at least a year now.  I don’t think it’s as bad as he does, but my sister is getting married and needs furniture for their new place.  What’s that old saying?  When opportunity knocks… you give away the couch.  Yeah, something like that.

So last weekend we went couch shopping again.  Our goal was to find a couch with the following features:

– super duper comfortable
– similar overall size to our current couch
– bigger seating area (i.e. smaller arms) than what we have now
– clean lined, but not ultra modern
– made in the USA
– built to last 20+ years

We went to a furniture gallery in Minneapolis and quickly fell in love with a manufacturer (Lee Industries) and a fabric (a heavy 100% cotton with a subtle basket weave texture, in a putty color).  But since this is me and Peter we are talking about, you had to have already guessed the one thing we couldn’t agree on.  That’s right… style!

To help us sort it out I put together an idea board for our living room.  This first one shows my couch choice (pictured in a linen fabric, not the cotton we like):

And this is the same board with Peter’s choice (again, not in the fabric we chose):

Peter’s biggest objections to my choice were that it is two inches shallower than his (possibly making it less comfortable) and that he didn’t like the ‘swooping arms’.  My objection to his choice was that it was just too boxy for the slightly ornate rug that it would be sitting on.  We sat on the decision for a few days and it was beginning to look like we might just keep our current couch after all, when Peter came up with a compromise.  He said he would let me have final say on the living room couch if he got final say when it came time to replace the family room couch.  And while I am loathe to give up an ounce of decorative control in my house, I had to acknowledge the fairness of the offer, and I took it.

So, we will be getting my couch for the living room.  (Picture me doing a Rocky-style victory dance around my house.)  Now we just have to finalize the order and wait eight to ten weeks for delivery.  Eight to ten weeks… uggg!  But they say you can’t rush perfection, so I will sit on pins and needles and pray that it really will be perfect.  Because if it’s not, I’ll never hear the end of it.

Oh the suspense!